What is a VPC in AWS?
Before going in-depth, firstly, you need to know what a VPC is. VPC stands for Virtual Private Cloud. Amazon Virtual Private Cloud (Amazon VPC) enables you to launch AWS resources into a virtual network that you've defined. This virtual network closely resembles a traditional network that you'd operate in your own data centre, with the benefits of using the scalable infrastructure of AWS. It is the most significant security boundary provided by Amazon Web Services. AWS provides you with a web-based user interface to create your VPC.
You will need to create an Amazon Web Services account to access your AWS console or dashboard and create your VPC. These are the specific terminology you need to be familiar with before starting this VPC tutorial:
VPC: the virtual private cloud that creates an isolated network on the cloud for your resources.
- Subnet: this is the range of IP addresses that you have available in your VPC
- Route table: these are rules that determine where your network traffic will go
- Internet gateway: The internet gateway will connect your virtual private cloud resources to the internet and between your resources
- VPC endpoint: A VPC endpoint enables private connections between your VPC and supported AWS services
How to Setup a VPC in AWS
In this scenario we will launch two EC2 instances, in which you will use one for an application (APP) server and the other for a database (DB) server. The APP server EC2 instance will be accessible through the internet IP address. We will then connect the database server with the application server internally by using a VPC subnet. The DB Server will not be accessible over the internet for security reasons. Let's get started.
Create a VPC:
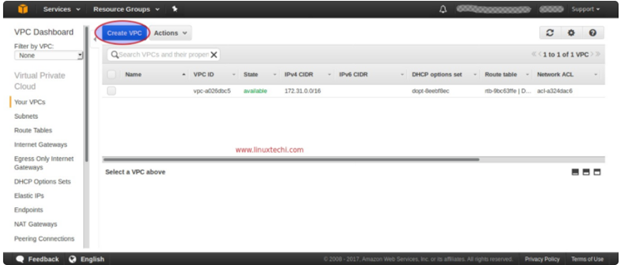
- First of all, you need to log in to your AWS account; then, you need to reach for “Select VPC” from the services tab. There you need to choose your VPC and click on “Create VPC.”
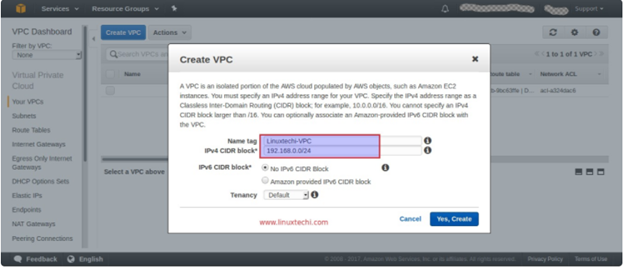
- The next step is to specify a name for your VPC and classless inter-domain routing (CIDR) block. Then you click on the “yes, create” option to create it.
Create VPC subnets:
If you want to create the subnets, then you will need to follow the below-mentioned steps. Let’s have a look.
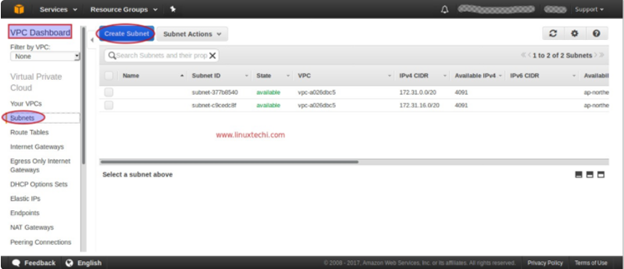
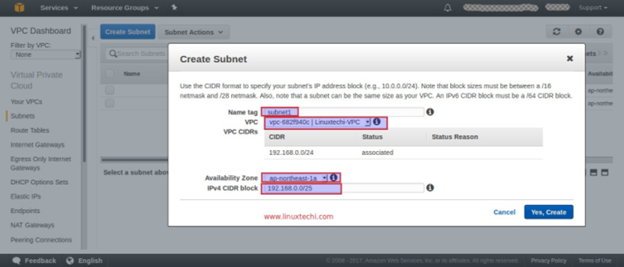
- Click on the “subnets” option in the VPC dashboard and then click “create subnet” to continue
- Enter the information required.
- Click on “yes, create” to confirm the creation of the subnet. You can use this procedure to create as many subnets as you require.
Create an internet gateway:
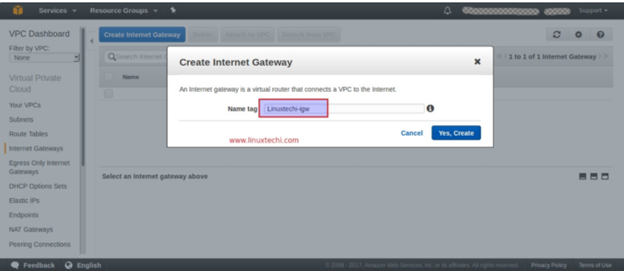
- We will now create an internet gateway, click 'internet gateway' on the left and click 'create internet gateway'
- Enter the name of the gateway and click 'yes, create gateway.
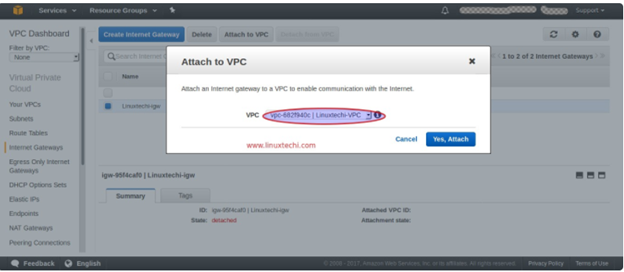
- After creating the gateway, you will need to attach it to your VPC. To do this, you need to select the gateway that you want to connect and then right-click on it to get the option “attach to VPC.”
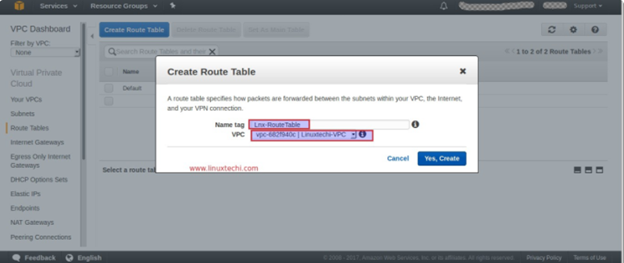
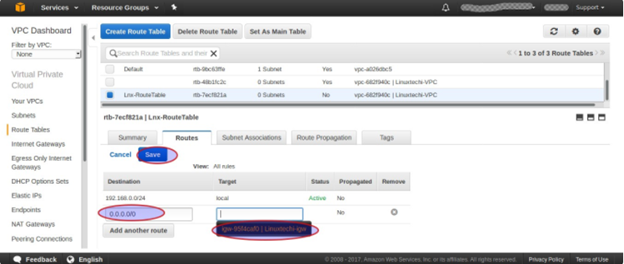
- The next step is to add a route to the route table that you created previously. For this, you need to go to the route tables area, and then select your route table
- After selecting your route table, you need to click on the route tab and then select the edit option and click on “add another route”
- Then you need to enter the destination IP address of the internet. And then, your desired internet gateway will be populated automatically.
- Then you need to click on the “save” option to confirm the changes.
Change route table for VPC subnet:
Now, it is time to change the routeing table for your VPC subnet.
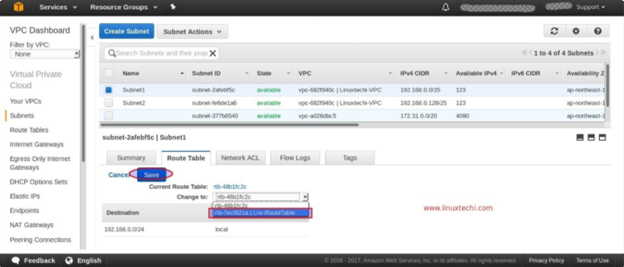
- Go to the VPC dashboard and select the VPC that you want to change the routeing table for.
- Click on the “route table” option and then select the edit option.
- Now, you need to change the default route table to “LNX-RouteTable” and then hit on save option.
Launch the APP and a DB Server Instance in the VPC:
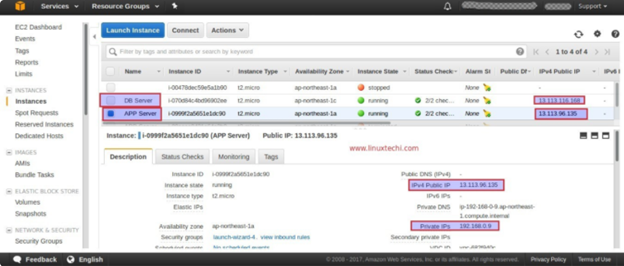
If you created two subnets previously, you will need to launch the APP server in one subnet, subnet1, and the DB server using the other subnet, subnet2.
You now need to try to SSH APP server through its public IP.
- You will notice that the DB server is not connected to the internet, for security reasons and because we launched it through subnet2 using its default route table. Because the internet gateway was not associated with the route Table of subnet2, we cannot access it through the internet.
Last words
Setting up yuour VPC in Amazon Web Services is a relatively simple thing to do. However you still need to be very careful when setting things up as small mistakes can lead to security problems.


Leave a Reply