Facebook has for some time now allowed businesses to verify their page. This is a simple step by step guide to verify your Facebook business page. Once confirmed you will see a ‘grey’ tick on your business page. This is different from the ‘blue’ tick displayed on Facebook verified celebrity pages.
Do keep in mind that the ability to verify your Facebook business page is not available yet in all regions.
Verify your Facebook business page – step by step
- Go to settings in the top right of your page
- Find the ‘general’ section, click ‘edit’
- Click ‘verify this page’

- Enter a phone number, extension (optional), country and call language. The phone number must be the same as the ‘publicly listed phone number’. If this is not the case, you will still receive the verification call and code, but verification will fail
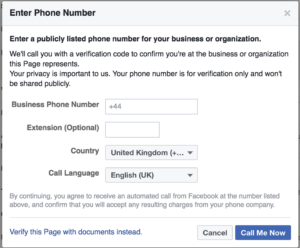
- Click ‘call me now’ to begin the verification process
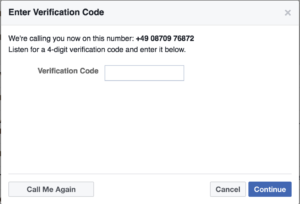
- Once you receive the automated call and four digit code, enter it on the verification screen.
If you wish to manually verify your business Facebook advises the following:
If you prefer to verify your Page with a business document, follow the steps above and click Verify this Page with documents instead at the bottom left of the window that appears, then upload a picture of an official document showing your business’s name and address. After we receive your verification code or business document, we’ll review your info to confirm that it matches public records and send you a notification or email about your verification status within a few days.
Adapted and expanded on from this original post on Facebook


Leave a Reply